Difference between revisions of "Documentation:Blackboard Learn Support Resources/blackboard collaborate"
Jump to navigation
Jump to search
| Line 45: | Line 45: | ||
* 10. If you have access to conference calling features, enter the details. Enter any instructions for students as necessary. | * 10. If you have access to conference calling features, enter the details. Enter any instructions for students as necessary. | ||
DO NOT click submit. Scroll to the top of the page and click ‘Content Area’. | DO NOT click submit. Scroll to the top of the page and click ‘Content Area’. | ||
| + | |||
| + | [[File:BB_Coll_Share_1.png|450px|centre]] | ||
| + | |||
| + | [[File:BB_Coll_Share_2.png|450px|centre]] | ||
| + | |||
* 11. Blackboard will place a link to the session in the location that you specify. Give the Content link a name. Check the box beside the desired link location (click the double chevron to expand the options). Sharing Tab Content Area Tab | * 11. Blackboard will place a link to the session in the location that you specify. Give the Content link a name. Check the box beside the desired link location (click the double chevron to expand the options). Sharing Tab Content Area Tab | ||
* 12. Indicate when the link to the session should be available. | * 12. Indicate when the link to the session should be available. | ||
Revision as of 10:50, 26 January 2015
Instructions for Blackboard Learn 9.1: Blackboard Collaborate
Blackboard Learn allows instructors to create and manage Blackboard Collaborate (formerly Elluminate) sessions from within the course. Follow these instructions to create a session and put a link on your homepage.
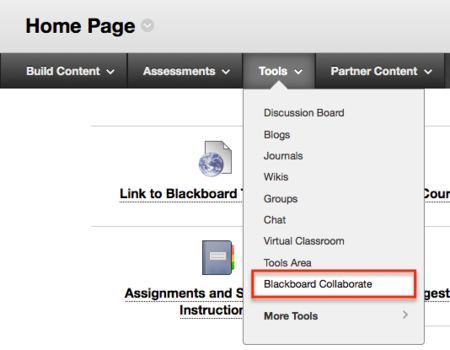
- 1. Under the Control Panel, click ‘Course Tools’ then ‘Blackboard Collaborate’.
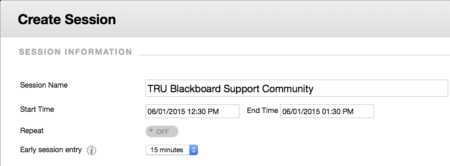
- 2. Click ‘Create Session’. Information Tab
- 3. Give the session a title.
- 4. Set the start and end times for the session. Set the ‘Early session entry’ time. Indicate whether or not the session will repeat.
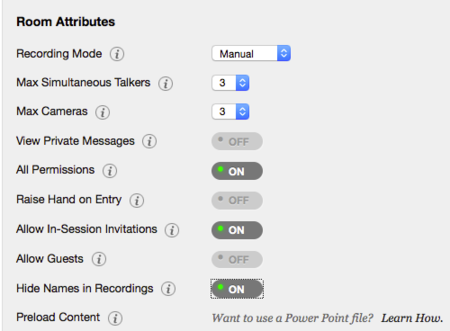
- 5. Set the Session Attributes as appropriate. You may want to consider allowing in-session invitations.
- 6. Indicate whether or not you want to integrate with the Grade Center.
DO NOT click submit. Scroll up to the top of the page and click ’Participation’.
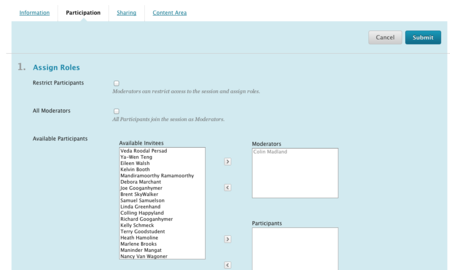
- 7. Set the participation roles.
Leave the ‘Restrict Participants’ box unchecked to include all course users.
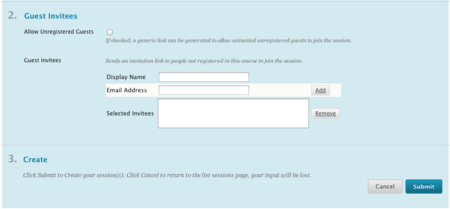
- 8. Indicate whether you will allow unregistered guests from outside your course. Add any invitees as necessary.
DO NOT click submit. Scroll to the top and click ‘Sharing’.
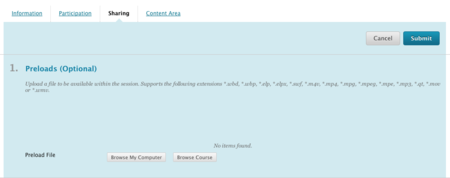
- 9. To ensure a smooth beginning to your session, you should pre-load your slides or other files. Click ‘Browse My Computer’ or ‘Browse Course’ to find your files.
- 10. If you have access to conference calling features, enter the details. Enter any instructions for students as necessary.
DO NOT click submit. Scroll to the top of the page and click ‘Content Area’.
- 11. Blackboard will place a link to the session in the location that you specify. Give the Content link a name. Check the box beside the desired link location (click the double chevron to expand the options). Sharing Tab Content Area Tab
- 12. Indicate when the link to the session should be available.
Click ‘Submit’.
- 13. The session will now be in the list of scheduled sessions. If you record your session, it will be available under ‘Recordings’.
- 14. The link will appear in the appropriate place and at the appropriate time according to the settings in #11, above.
