Difference between revisions of "Documentation:Blackboard Learn Support Resources/creating assesments"
(Created page with "=Creating Assessments= In order to use a test or survey in Blackboard Learn 9.1, you must first create the test and then deploy it in a content area, such as a Learning Modul...") |
|||
| (20 intermediate revisions by the same user not shown) | |||
| Line 3: | Line 3: | ||
In order to use a test or survey in Blackboard Learn 9.1, you must first create the test and then deploy it in a content area, such as a Learning Module or Content Folder, to make it available to students. Open Learning courses will have all required tests and quizzes created and deployed before the course goes live. On Campus Faculty who had their course copied from Blackboard 8 will have had all assessments copied as well but will need to test all assessments prior to deployment. | In order to use a test or survey in Blackboard Learn 9.1, you must first create the test and then deploy it in a content area, such as a Learning Module or Content Folder, to make it available to students. Open Learning courses will have all required tests and quizzes created and deployed before the course goes live. On Campus Faculty who had their course copied from Blackboard 8 will have had all assessments copied as well but will need to test all assessments prior to deployment. | ||
| − | + | On Campus Faculty who need to create a new assessment can follow these instructions. | |
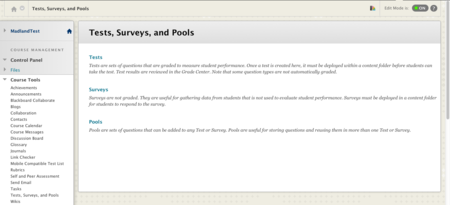
| − | + | ===From the Course Management menu, click ‘Control Panel’. Click ‘Course Tools’. Click ‘ Tests, Surveys and Pools’. Click ‘Tests’.=== | |
| − | click ‘Control Panel’. | + | [[File:Test_1.png|450px|centre]] |
| − | Click ‘Course Tools’. | ||
| − | Click ‘ Tests, Surveys and Pools’. | ||
| − | Click ‘Tests’. | ||
| − | |||
| − | |||
| − | |||
| − | |||
| − | |||
| − | |||
| − | |||
| − | |||
| − | This tutorial will cover creating a | + | ===Click ‘Build Test’.=== |
| − | Multiple Choice question. | + | [[File:Test2.png|450px|centre]] |
| − | Not all Settings are shown in this tutorial. | + | |
| − | + | ===Give the test a name and description. Create an Assessment=== | |
| − | + | [[File:Test_3.png|450px|centre]] | |
| − | Enter the text of your question in the | + | |
| − | Content Editor. | + | ===Enter student instructions and click ‘Submit’.=== |
| − | + | [[File:Test_4.png|450px|centre]] | |
| − | These options are not saved for | + | |
| − | subsequent questions. | + | ===You will see a green bar indicating that your test has been created. Click ‘Question Settings’.=== |
| − | + | [[File:Test_5.png|450px|centre]] | |
| − | if necessary. | + | |
| − | Enter the correct answer and the | + | ===Carefully review and edit the Test Question Settings. Click ‘Submit’.=== |
| − | distractors in the spaces provided. | + | [[File:Test_6.png|450px|centre]] |
| − | Make sure you identify which is the | + | |
| − | correct answer. | + | ===On the Test Canvas, hover your cursor over ‘Create Question’ and choose the type of question you would like to create. This tutorial will cover creating a Multiple Choice question. Not all Settings are shown in this tutorial.=== |
| − | + | [[File:Test_7.png|450px|centre]] | |
| − | incorrect responses. | + | |
| − | You can edit this setting in the ‘Question | + | ===A Question Title is optional. Enter the text of your question in the Content Editor.=== |
| − | Settings’ area (see #5 and #6, above). | + | [[File:Test_9.png|450px|centre]] |
| − | + | ||
| − | + | ===Set the options for the question. These options are not saved for subsequent questions.=== | |
| − | (metadata) will help you manage your | + | [[File:Test_8.png|450px|centre]] |
| − | Question Sets. | + | |
| − | Enter any Instructor Notes that may be | + | ===Adjust the number of answer options, if necessary. Enter the correct answer and the distractors in the spaces provided. Make sure you identify which is the correct answer.=== |
| − | helpful for you. | + | [[File:Test_10.png|450px|centre]] |
| − | Instructor Notes are not visible to | + | |
| − | students. | + | ===Enter feedback text for correct and incorrect responses. You can edit this setting in the ‘Question Settings’ area (see #5 and #6, above).=== |
| − | + | [[File:Test_11.png|450px|centre]] | |
| − | ‘Submit’. | + | |
| − | + | ===Adding Categories and Keywords (metadata) will help you manage your Question Sets.Enter any Instructor Notes that may be helpful for you. Instructor Notes are not visible to students.=== | |
| − | Use the yellow bar on the left to move | + | [[File:Test_12.png|450px|centre]] |
| − | the question. | + | |
| − | Click a ‘+’ sign to add a question before | + | ===Click ‘Submit and Create Another’ or ‘Submit’.=== |
| − | or after the present question. | + | [[File:Test_13.png|450px|centre]] |
| − | Change the number of points if desired. | + | |
| − | Once you have created the assessment and added all your questions, you must deploy it into a | + | ===Confirm the details of the item.=== |
| − | content area in your course in order for students to access it. | + | * Use the yellow bar on the left to move the question. Click a ‘+’ sign to add a question before or after the present question. |
| − | Deploy an Assessment | + | * Change the number of points if desired. |
| − | + | * Once you have created the assessment and added all your questions, you must deploy it into a content area in your course in order for students to access it. | |
| − | cursor over ‘Build Content’ and choose | + | [[File:Test_14.png|450px|centre]] |
| − | ‘Content Folder’. | + | |
| − | + | =Deploy an Assessment= | |
| − | + | ||
| − | Use the Content Editor to enter | + | ====From the course homepage, hover your cursor over ‘Build Content’ and choose ‘Content Folder’.==== |
| − | instructions, if necessary. | + | [[File:Test_15.png|450px|centre]] |
| − | + | ||
| − | Make sure that you permit users to view | + | ====Give the Content Folder a relevant name. Use the Content Editor to enter instructions, if necessary.==== |
| − | the content. | + | [[File:Test_16.png|450px|centre]] |
| − | Click ‘Submit’. | + | |
| − | + | ====Edit Learning Module options. Make sure that you permit users to view the content. Click ‘Submit’.==== | |
| − | homepage. | + | [[File:Test_17.png|450px|centre]] |
| − | + | ||
| − | choose ‘Test’. | + | ====Click on the Content Folder on your homepage.==== |
| − | + | [[File:Test_18.png|450px|centre]] | |
| − | tests. | + | |
| − | Click ‘Submit’. | + | ====Hover your cursor over ‘Assessments’ and choose ‘Test’.==== |
| − | + | [[File:Test_19.png|450px|centre]] | |
| − | + | ||
| − | Options. | + | ====Select a test from the list of existing tests. Click ‘Submit’.==== |
| − | + | [[File:Test_20.png|450px|centre]] | |
| − | available so that students can access | + | |
| − | the test. | + | ====Carefully review and edit the Test Options.==== |
| − | Check the ‘Force Completion’ checkbox | + | [[File:Test_21.png|450px|centre]] |
| − | if you want students to complete the | + | |
| − | assessment in one sitting. | + | ====Make sure that you make the link available so that students can access the test.==== |
| − | Check the ‘Set Timer’ | + | * Check the ‘Force Completion’ checkbox if you want students to complete the assessment in one sitting. |
| − | enter the amount of time students are | + | * Check the ‘Set Timer’ check box and enter the amount of time students are allowed to complete the assessment. |
| − | allowed to complete the assessment. | + | * Choose ‘ON’ if you want the assessment to save and submit automatically at the end of the allotted time. |
| − | Choose ‘ON’ if you want the assessment | + | [[File:Test_22.png|450px|centre]] |
| − | to save and submit automatically at the | + | |
| − | end of the | + | =====Note===== |
| − | + | ||
| − | If you have selected the ‘Force Completion’ option, | + | If you have selected the ‘Force Completion’ option, and students use the ‘Back’ button in their browser, the exam will be submitted automatically. Please see the ‘Test Presentation’ options (#14) below for more information. |
| − | and students use the ‘Back’ button in their browser, | + | |
| − | the exam will be submitted automatically. Please see | + | ====Set the availability dates to control when students will have access to the link to the assessment.==== |
| − | the ‘Test Presentation’ options (#14) below for more | + | * If you leave the boxes unchecked, the link will always be available to all users. |
| − | information. | + | * Click the ‘Password’ checkbox and enter a password if you would like to control access to the assessment with a password. |
| − | + | [[File:Test_23.png|450px|centre]] | |
| − | when students will have access to the | + | |
| − | link to the assessment. | + | ====If individual students or groups need different access times for the assessment, click ‘Add User or Group’, choose the users or groups and set the different access times.==== |
| − | If you leave the boxes unchecked, the | + | ====Set the assessment due date, if any, and indicate whether students will be able to start the assessment after the due date ahs passed.==== |
| − | link will always be available to all users. | + | [[File:Test_Options_4.png|450px|centre]] |
| − | Click the ‘Password’ checkbox and | + | |
| − | enter a password if you would like to | + | ====Set the self-assessment options.==== |
| − | control access to the assessment with a | + | [[File:Test_Options_5.png|450px|centre]] |
| − | password. | + | |
| − | + | ====Determine when students will see feedback on their performance and what information they will see. You may set up to two different conditions as exemplified in the screenshot.==== | |
| − | need different access times for the | + | [[File:Test_Options_6.png|450px|centre]] |
| − | assessment, click ‘Add User or Group’, | + | |
| − | choose the users or groups and set the | + | ====Determine how the test will be presented.==== |
| − | different access times. | + | <br /> |
| − | + | It is recommended that you present questions all at once to avoid the need for students to use the ‘Back’ button in their browser. See the note in #8, above. | |
| − | + | [[File:Test_Options_7.png|450px|centre]] | |
| − | + | ||
| − | + | ====Click ‘Submit’ to deploy the test.==== | |
| − | + | [[File:Test_24.png|450px|centre]] | |
| − | + | ||
| − | and indicate whether students will be | + | ====A test that has not been made available will be greyed out.==== |
| − | able to start the assessment after the | + | [[File:Test_25.png|450px|centre]] |
| − | due date ahs passed. | ||
| − | |||
| − | |||
| − | feedback on their performance and | ||
| − | what information they will see. | ||
| − | You may set up to two different | ||
| − | conditions as exemplified in the | ||
| − | screenshot. | ||
| − | |||
| − | presented. It is recommended that you | ||
| − | present questions all at once to avoid | ||
| − | the need for students to use the ‘Back’ | ||
| − | button in their browser. | ||
| − | See the note in #8, above. | ||
Latest revision as of 16:23, 29 January 2015
Creating Assessments
In order to use a test or survey in Blackboard Learn 9.1, you must first create the test and then deploy it in a content area, such as a Learning Module or Content Folder, to make it available to students. Open Learning courses will have all required tests and quizzes created and deployed before the course goes live. On Campus Faculty who had their course copied from Blackboard 8 will have had all assessments copied as well but will need to test all assessments prior to deployment.
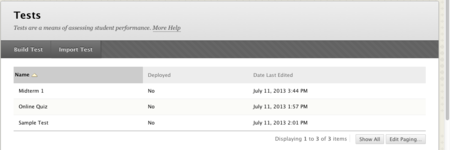
On Campus Faculty who need to create a new assessment can follow these instructions.
Click ‘Build Test’.
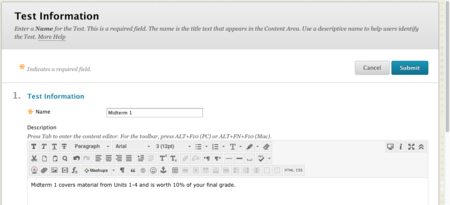
Give the test a name and description. Create an Assessment
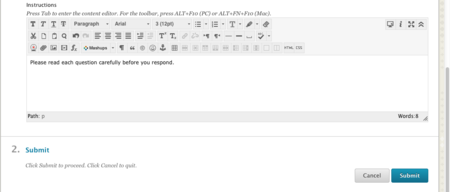
Enter student instructions and click ‘Submit’.
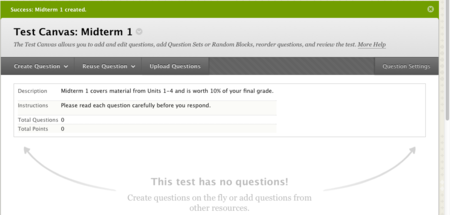
You will see a green bar indicating that your test has been created. Click ‘Question Settings’.
Carefully review and edit the Test Question Settings. Click ‘Submit’.
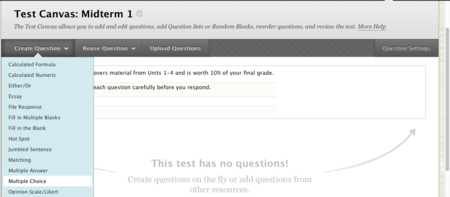
On the Test Canvas, hover your cursor over ‘Create Question’ and choose the type of question you would like to create. This tutorial will cover creating a Multiple Choice question. Not all Settings are shown in this tutorial.
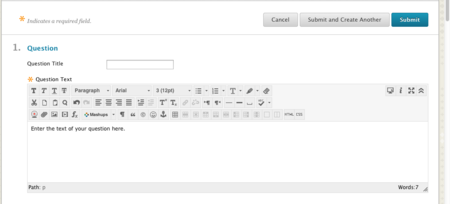
A Question Title is optional. Enter the text of your question in the Content Editor.
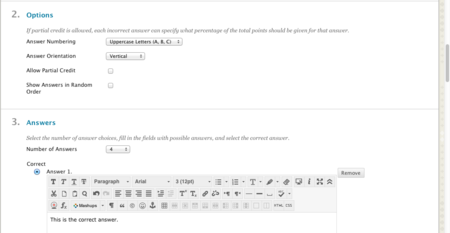
Set the options for the question. These options are not saved for subsequent questions.
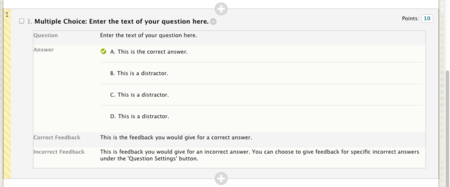
Adjust the number of answer options, if necessary. Enter the correct answer and the distractors in the spaces provided. Make sure you identify which is the correct answer.
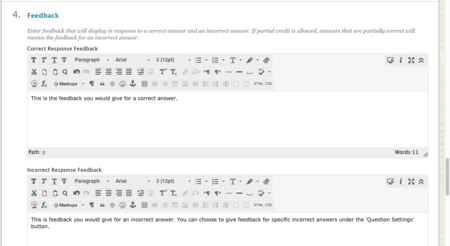
Enter feedback text for correct and incorrect responses. You can edit this setting in the ‘Question Settings’ area (see #5 and #6, above).
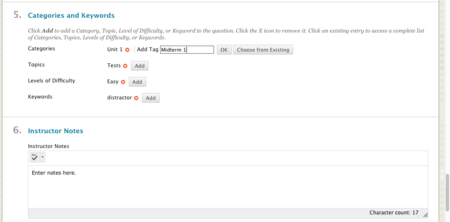
Adding Categories and Keywords (metadata) will help you manage your Question Sets.Enter any Instructor Notes that may be helpful for you. Instructor Notes are not visible to students.
Click ‘Submit and Create Another’ or ‘Submit’.
Confirm the details of the item.
- Use the yellow bar on the left to move the question. Click a ‘+’ sign to add a question before or after the present question.
- Change the number of points if desired.
- Once you have created the assessment and added all your questions, you must deploy it into a content area in your course in order for students to access it.
Deploy an Assessment
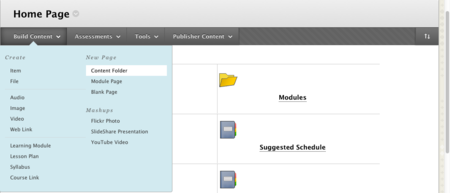
From the course homepage, hover your cursor over ‘Build Content’ and choose ‘Content Folder’.
Give the Content Folder a relevant name. Use the Content Editor to enter instructions, if necessary.
Edit Learning Module options. Make sure that you permit users to view the content. Click ‘Submit’.
Click on the Content Folder on your homepage.
Hover your cursor over ‘Assessments’ and choose ‘Test’.
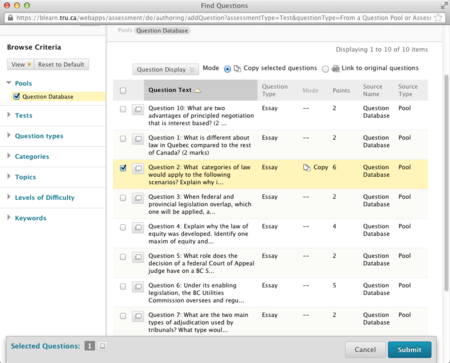
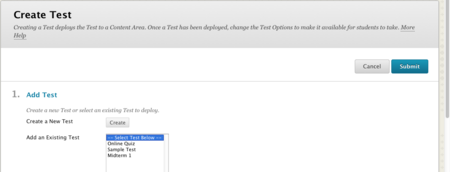
Select a test from the list of existing tests. Click ‘Submit’.
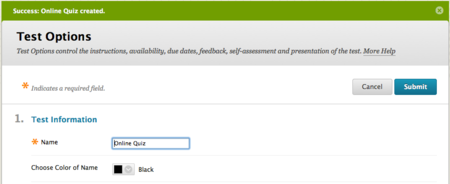
Carefully review and edit the Test Options.
Make sure that you make the link available so that students can access the test.
- Check the ‘Force Completion’ checkbox if you want students to complete the assessment in one sitting.
- Check the ‘Set Timer’ check box and enter the amount of time students are allowed to complete the assessment.
- Choose ‘ON’ if you want the assessment to save and submit automatically at the end of the allotted time.
Note
If you have selected the ‘Force Completion’ option, and students use the ‘Back’ button in their browser, the exam will be submitted automatically. Please see the ‘Test Presentation’ options (#14) below for more information.
Set the availability dates to control when students will have access to the link to the assessment.
- If you leave the boxes unchecked, the link will always be available to all users.
- Click the ‘Password’ checkbox and enter a password if you would like to control access to the assessment with a password.
If individual students or groups need different access times for the assessment, click ‘Add User or Group’, choose the users or groups and set the different access times.
Set the assessment due date, if any, and indicate whether students will be able to start the assessment after the due date ahs passed.
Set the self-assessment options.
Determine when students will see feedback on their performance and what information they will see. You may set up to two different conditions as exemplified in the screenshot.
Determine how the test will be presented.
It is recommended that you present questions all at once to avoid the need for students to use the ‘Back’ button in their browser. See the note in #8, above.
