Difference between revisions of "Documentation:Blackboard Learn Support Resources/managing the grade center"
ColinMadland (talk | contribs) (→Note:) |
|||
| (8 intermediate revisions by 2 users not shown) | |||
| Line 1: | Line 1: | ||
=Instructions for Blackboard Learn 9.1: Managing the Grade Center= | =Instructions for Blackboard Learn 9.1: Managing the Grade Center= | ||
| − | The Grade Center in Blackboard Learn allows you to view, edit and submit student grades. Students who access their grades through ‘My Grades’ in Blackboard will be drawing from the Grade Center. | + | ==The Grade Center in Blackboard Learn allows you to view, edit and submit student grades. Students who access their grades through ‘My Grades’ in Blackboard will be drawing from the Grade Center.== |
| − | |||
* Click ‘Grade Center’ and then ‘Full Grade Center’. You should set up your Grade Center to match the grading structure of your course. | * Click ‘Grade Center’ and then ‘Full Grade Center’. You should set up your Grade Center to match the grading structure of your course. | ||
* There should be a column for each assignment or assessment in your course, including the final exam or project. | * There should be a column for each assignment or assessment in your course, including the final exam or project. | ||
| Line 9: | Line 8: | ||
[[File:Grade_Center_1.png|450px|centre]] | [[File:Grade_Center_1.png|450px|centre]] | ||
| − | + | =Create a Column= | |
| − | |||
* 1. Click ‘Create Column’. | * 1. Click ‘Create Column’. | ||
[[File:Grade_Center_2.png|450px|centre]] | [[File:Grade_Center_2.png|450px|centre]] | ||
* 2. Give the column a name. The Grade Center Name and Description are optional. | * 2. Give the column a name. The Grade Center Name and Description are optional. | ||
[[File:Grade_Center_3.png|450px|centre]] | [[File:Grade_Center_3.png|450px|centre]] | ||
| − | |||
| − | + | ===Adjust the Primary and Secondary Display settings according to your preferences.=== | |
| − | + | * Enter a Category, if desired. | |
| − | + | * Enter the Points Possible. | |
| − | Add a Rubric, if desired. | + | * Add a Rubric, if desired. |
[[File:Grade_Center_4.png|450px|centre]] | [[File:Grade_Center_4.png|450px|centre]] | ||
| − | + | ===Enter a Due Date, if necessary.=== | |
| − | + | [[File:Grade_Center_5.png|450px|centre]] | |
| − | + | ===You will likely want to include the column in Grade Center calculations and show the column to students.=== | |
| + | [[File:Grade_Center_6.png|450px|centre]] | ||
| + | ===Click ‘Submit’.=== | ||
| − | + | =External Grade= | |
The External Grade, identified by a green checkmark, is the grade that the student will see as their current total upon clicking ‘My Grades’. The default ‘Total’ column is simply the sum of all of the student’s scores to that point in the course. To show students their actual current grade, follow the steps below.[[File:Grade_Center_7.png|450px|centre]] | The External Grade, identified by a green checkmark, is the grade that the student will see as their current total upon clicking ‘My Grades’. The default ‘Total’ column is simply the sum of all of the student’s scores to that point in the course. To show students their actual current grade, follow the steps below.[[File:Grade_Center_7.png|450px|centre]] | ||
| − | + | ===Click the dropdown beside the default ‘Weighted Total’ column and choose ‘Edit Column Information’.=== | |
| − | + | ||
| − | If you do not see a ‘Weighted Total’ column, you may have to show it | + | ====Note:==== |
| − | + | If you do not see a ‘Weighted Total’ column, you may have to show it, or you may have to create a new one by hovering over ‘Create Calculated Column’ and choosing ‘Weighted Column’. To see hidden columns or to change the order of columns, click ‘Manage’ and choose ‘Column Organization’. | |
| + | |||
| + | ====Note:==== | ||
The Secondary Display will be displayed in brackets beside the Primary Display, allowing you to show students their score and their percentage in one display. | The Secondary Display will be displayed in brackets beside the Primary Display, allowing you to show students their score and their percentage in one display. | ||
| − | + | ===Edit the column name, if desired. Adjust the Primary and Secondary Display settings appropriately.=== | |
| − | + | [[File:Grade_Center_8.png|450px|centre]] | |
| − | Use the arrow to move the columns into the ‘Selected Columns’ section. | + | ===Select the columns that you need included in the final grade.=== |
| − | Enter the percentage weighting for each item that needs to be included in the final grade. The total of all weights must equal 100. | + | * Make sure you consult the Course Guide or syllabus for the assessment structure. |
| − | Select ‘Yes’ to ‘Calculate the column as a Running Total’. | + | * Use the arrow to move the columns into the ‘Selected Columns’ section. |
| − | + | * Enter the percentage weighting for each item that needs to be included in the final grade. The total of all weights must equal 100. | |
| − | Click ‘Submit’. | + | * Select ‘Yes’ to ‘Calculate the column as a Running Total’. |
| − | + | [[File:Grade_Center_9.png|450px|centre]] | |
| − | + | ===Click ‘Yes’ to ‘Show this Column to Students’.=== | |
| + | Click ‘Submit’.[[File:Grade_Center_10.png|450px|centre]] | ||
| + | ===Click the dropdown beside the newly edited column and choose ‘Set as External Grade’.=== | ||
| + | [[File:Grade_Center_11.png|450px|centre]] | ||
| + | ===Click the dropdown beside the default ‘Total’ column and choose ‘Delete Column’.=== | ||
| + | [[File:Grade_Center_12.png|450px|centre]] | ||
'''Important Note:''' | '''Important Note:''' | ||
Latest revision as of 09:28, 3 February 2015
Instructions for Blackboard Learn 9.1: Managing the Grade Center
The Grade Center in Blackboard Learn allows you to view, edit and submit student grades. Students who access their grades through ‘My Grades’ in Blackboard will be drawing from the Grade Center.
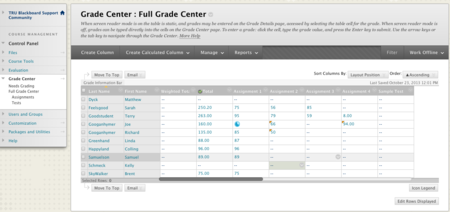
- Click ‘Grade Center’ and then ‘Full Grade Center’. You should set up your Grade Center to match the grading structure of your course.
- There should be a column for each assignment or assessment in your course, including the final exam or project.
- Assignments, quizzes or mid-term exams in Blackboard will automatically be shown in the Grade Center.
- You may have to set discussions to be gradable, or create a column to enter the student’s total score on all discussions.
Create a Column
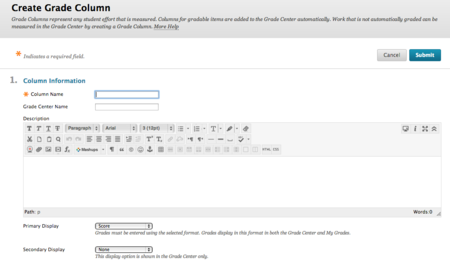
- 1. Click ‘Create Column’.
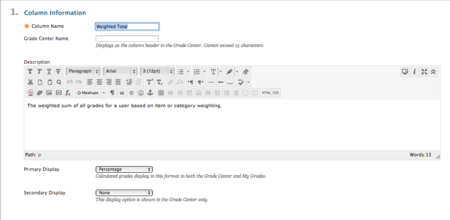
- 2. Give the column a name. The Grade Center Name and Description are optional.
Adjust the Primary and Secondary Display settings according to your preferences.
- Enter a Category, if desired.
- Enter the Points Possible.
- Add a Rubric, if desired.
Enter a Due Date, if necessary.
You will likely want to include the column in Grade Center calculations and show the column to students.
Click ‘Submit’.
External Grade
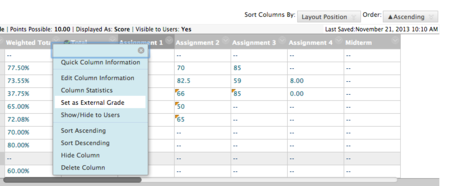
The External Grade, identified by a green checkmark, is the grade that the student will see as their current total upon clicking ‘My Grades’. The default ‘Total’ column is simply the sum of all of the student’s scores to that point in the course. To show students their actual current grade, follow the steps below.
Click the dropdown beside the default ‘Weighted Total’ column and choose ‘Edit Column Information’.
Note:
If you do not see a ‘Weighted Total’ column, you may have to show it, or you may have to create a new one by hovering over ‘Create Calculated Column’ and choosing ‘Weighted Column’. To see hidden columns or to change the order of columns, click ‘Manage’ and choose ‘Column Organization’.
Note:
The Secondary Display will be displayed in brackets beside the Primary Display, allowing you to show students their score and their percentage in one display.
Edit the column name, if desired. Adjust the Primary and Secondary Display settings appropriately.
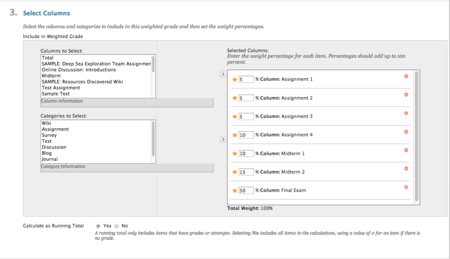
Select the columns that you need included in the final grade.
- Make sure you consult the Course Guide or syllabus for the assessment structure.
- Use the arrow to move the columns into the ‘Selected Columns’ section.
- Enter the percentage weighting for each item that needs to be included in the final grade. The total of all weights must equal 100.
- Select ‘Yes’ to ‘Calculate the column as a Running Total’.
Click ‘Yes’ to ‘Show this Column to Students’.
Click ‘Submit’.
Click the dropdown beside the newly edited column and choose ‘Set as External Grade’.
Click the dropdown beside the default ‘Total’ column and choose ‘Delete Column’.
Important Note: Open Learning Faculty Members must still enter grades into myTRU and myTRU is the official record of student grades.
If you have questions, please contact elearningfacilitator@tru.ca.
