Difference between revisions of "Documentation:Blackboard Learn Support Resources/retention center"
Jump to navigation
Jump to search

Mschuurman (talk | contribs) m (changed faculty to OLFMs) |
|||
| (3 intermediate revisions by one other user not shown) | |||
| Line 1: | Line 1: | ||
=Instructions for Blackboard Learn 9.1: Retention Center= | =Instructions for Blackboard Learn 9.1: Retention Center= | ||
| − | The Retention Center in Blackboard Learn 9.1 allows | + | The Retention Center in Blackboard Learn 9.1 allows OLFMs to monitor student activity and progress and to easily contact |
students at risk. | students at risk. | ||
| − | + | ===There are two ways to access the Retention Center:=== | |
| − | Retention Center: | ||
* Click the Global Navigation Menu in the top right corner and then the Retention Center link (up and down arrows) to see an overview of all of your courses (top image).[[File:Retention_1.png|450px|centre]] | * Click the Global Navigation Menu in the top right corner and then the Retention Center link (up and down arrows) to see an overview of all of your courses (top image).[[File:Retention_1.png|450px|centre]] | ||
* From inside any course, click ‘Evaluation’ in the Control Panel and then ‘Retention Center’ (bottom image). | * From inside any course, click ‘Evaluation’ in the Control Panel and then ‘Retention Center’ (bottom image). | ||
| Line 22: | Line 21: | ||
===Course Overview=== | ===Course Overview=== | ||
| − | * The red bar indicates the number of students at risk. | + | * The red bar indicates the number of students at risk. [[File:Retention_8.png|450px|centre]] |
* The table shows the students at risk, in rows, and the general reason for their risk status, in the four columns. | * The table shows the students at risk, in rows, and the general reason for their risk status, in the four columns. | ||
* Click on a student’s name to see details of that student’s risk factors (see middle image). | * Click on a student’s name to see details of that student’s risk factors (see middle image). | ||
| − | * Click on a red dot to see details of the particular risk factor for that student (see bottom image). | + | * Click on a red dot to see details of the particular risk factor for that student (see bottom image). [[File:Retention_9.png|450px|centre]] |
* Click ‘Monitor’ to add a student to the list of students you are monitoring. | * Click ‘Monitor’ to add a student to the list of students you are monitoring. | ||
* Click ‘Notify’ to contact a student about their performance in the course. | * Click ‘Notify’ to contact a student about their performance in the course. | ||
| − | * Click ‘Add a note’ to make a note to yourself about the student’s performance. | + | * Click ‘Add a note’ to make a note to yourself about the student’s performance. [[File:Retention_10.png|450px|centre]] |
* Click ‘Customize’ to add, edit or delete (top image; see instructions on the next page). | * Click ‘Customize’ to add, edit or delete (top image; see instructions on the next page). | ||
* Scroll to the bottom of the Retention Center page in your course to see your own course activity. | * Scroll to the bottom of the Retention Center page in your course to see your own course activity. | ||
| + | [[File:Retention_11.png|450px|centre]] | ||
===Customize the Retention Center=== | ===Customize the Retention Center=== | ||
| − | * | + | * From your course Retention Center, click ‘Customize’. |
[[File:Customize_RC_1.png|450px|centre]] | [[File:Customize_RC_1.png|450px|centre]] | ||
| − | * | + | * Hover your cursor over ‘Create Rule’ and choose the type of rule you would like to create. |
| − | * | + | * Give the rule a name and indicate whether or not you want it to display in the Risk Table. Define the rule criteria (this will vary depending on the type of rule you create). [[File:Customize_RC_2.png|450px|centre]] |
Click ‘Submit’ to save your rule. | Click ‘Submit’ to save your rule. | ||
Latest revision as of 15:06, 13 January 2017
Instructions for Blackboard Learn 9.1: Retention Center
The Retention Center in Blackboard Learn 9.1 allows OLFMs to monitor student activity and progress and to easily contact students at risk.
There are two ways to access the Retention Center:
- Click the Global Navigation Menu in the top right corner and then the Retention Center link (up and down arrows) to see an overview of all of your courses (top image).
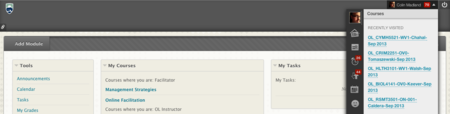
- From inside any course, click ‘Evaluation’ in the Control Panel and then ‘Retention Center’ (bottom image).

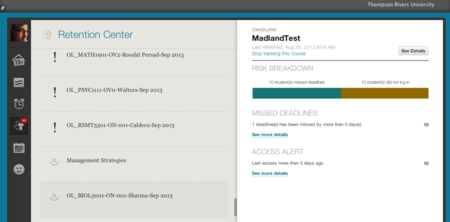
Global Overview
- Click on a course name in the list on the left to see details of that course on the right, .
- Click ‘See Details’ to go to the full Retention Center for the selected course.
- Courses with an ‘!’ in the course list have students identified as being at risk according to the established criteria.
- Courses with a smiley face have no students identified as being at risk.
- The ‘Risk Breakdown’ provides an overview of the selected course.
- Click ‘See more details’ to go the full Retention Center for the selected course.
- Click ‘Stop tracking this course’ to ... wait for it ... stop tracking the course.

Course Overview
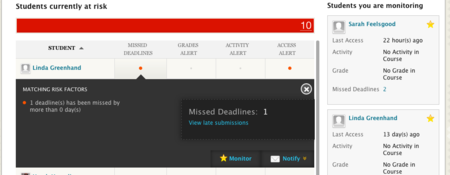
- The red bar indicates the number of students at risk.
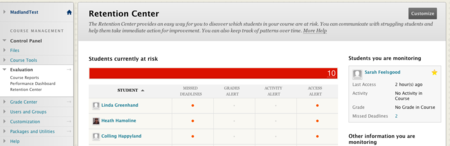
- The table shows the students at risk, in rows, and the general reason for their risk status, in the four columns.
- Click on a student’s name to see details of that student’s risk factors (see middle image).
- Click on a red dot to see details of the particular risk factor for that student (see bottom image).
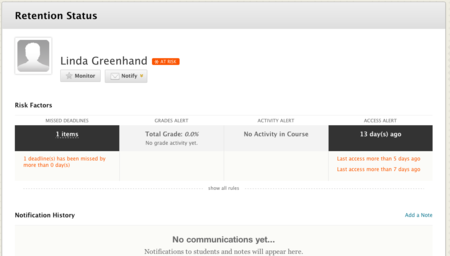
- Click ‘Monitor’ to add a student to the list of students you are monitoring.
- Click ‘Notify’ to contact a student about their performance in the course.
- Click ‘Add a note’ to make a note to yourself about the student’s performance.
- Click ‘Customize’ to add, edit or delete (top image; see instructions on the next page).
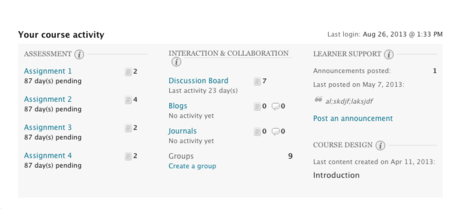
- Scroll to the bottom of the Retention Center page in your course to see your own course activity.


Customize the Retention Center
- From your course Retention Center, click ‘Customize’.

- Hover your cursor over ‘Create Rule’ and choose the type of rule you would like to create.
- Give the rule a name and indicate whether or not you want it to display in the Risk Table. Define the rule criteria (this will vary depending on the type of rule you create).
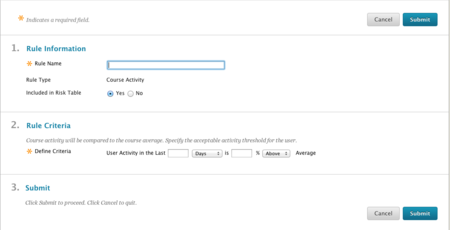

Click ‘Submit’ to save your rule.