Difference between revisions of "Documentation:Blackboard Learn Support Resources/email and course messages"
| Line 13: | Line 13: | ||
===Click ‘Email’ in the table of contents.=== | ===Click ‘Email’ in the table of contents.=== | ||
[[File:Email_1.png|450px|centre]] | [[File:Email_1.png|450px|centre]] | ||
| − | + | ===You can send a message to various different groupings of users or to individual users (not shown here).=== | |
| − | + | * Click the link to the grouping you would like to contact.[[File:Email_2.png|450px|centre]] | |
| − | + | ===Depending on what you select in Step 2, you may have to select recipients.=== | |
| − | The subject that you enter will be appended to the course name in the subject line of the sent mail. | + | *Click the recipient’s name and use the arrows to move them into the ‘Selected’ window.[[File:Email_3a.png|450px|centre]] |
| − | + | ===Recipients will be listed beside ‘To’.=== | |
| + | * Your email address is listed beside ‘From’. | ||
| + | * The subject that you enter will be appended to the course name in the subject line of the sent mail. | ||
| + | * There is no ‘Cc’ or ‘Bcc’ option because messages are sent out individually. | ||
| + | [[File:Email_3.png|450px|centre]] | ||
| − | + | A copy of the message is automatically sent to your email address and you can also request a receipt to confirm delivery. | |
Click ‘Attach a file’ to attach one or more files. | Click ‘Attach a file’ to attach one or more files. | ||
Click ‘Submit’ to send the message. | Click ‘Submit’ to send the message. | ||
[[File:Email_4.png|450px|centre]] | [[File:Email_4.png|450px|centre]] | ||
| + | |||
| + | =Course Messages= | ||
| + | |||
Course Messages The Course Messages tool keeps all messages within your course in Blackboard and users must login to the course to check for new messages or replies. | Course Messages The Course Messages tool keeps all messages within your course in Blackboard and users must login to the course to check for new messages or replies. | ||
You cannot set up notifications to be sent to an external email address. | You cannot set up notifications to be sent to an external email address. | ||
You cannot add attachments to a Course Message. | You cannot add attachments to a Course Message. | ||
| − | |||
| − | + | ===Click ‘Course Messages’ in the table of contents.=== | |
| − | Click ‘Create Message’. | + | * Click ‘Create Message’. |
[[File:CM1.png|450px|centre]] | [[File:CM1.png|450px|centre]] | ||
| − | |||
| − | + | ===Choose recipients as you would with an Email (above).=== | |
| − | Add a Tool to the Table of Contents | + | [[File:CM2.png|450px|centre]] |
| + | |||
| + | ===Enter a subject and a message.=== | ||
| + | * Click ‘Submit’ to send your message. | ||
| + | * Add a Tool to the Table of Contents | ||
[[File:CM3.png|450px|centre]] | [[File:CM3.png|450px|centre]] | ||
| − | + | =Add a Tool to the Table of Contents= | |
| − | + | ===To add a tool to the table of contents in your course, hover your cursor over the ‘+’ sign above the table of contents. | |
| − | Choose ‘Tool Link’. | + | Choose ‘Tool Link’.=== |
| − | + | ===Give the tool a name. Choose the type of tool from the dropdown menu.=== | |
| − | + | ===Make sure the tool is available to users.=== | |
| − | Click ‘Submit’. | + | * Click ‘Submit’. |
| − | + | ===Use the yellow handle to drag the tool to the desired spot in the table of contents.=== | |
If you have questions, please contact elearningfacilitator@tru.ca. | If you have questions, please contact elearningfacilitator@tru.ca. | ||
| − | + | =Delete a Tool from the Table of Contents= | |
| − | |||
| − | |||
| − | |||
| − | |||
| − | '''Caution:''' | + | ===Hover your cursor over the link to the tool you would like to delete.=== |
| + | * Click the dropdown arrow. | ||
| + | * Choose ‘Delete’. | ||
| + | * '''Caution:''' | ||
Be careful what you delete from the table of contents. If you delete a content area like a Learning Module or Content Folder, you may delete any content within it. | Be careful what you delete from the table of contents. If you delete a content area like a Learning Module or Content Folder, you may delete any content within it. | ||
Revision as of 11:11, 30 January 2015
Instructions for Blackboard Learn 9.1: Email and Course Messages
There are two different tools in Blackboard Learn that allow you to send messages to your students. This tutorial will outline the differences between the tools and provide instructions on their use.
Email The ‘Email’ tool allows you to send an email to the email address that students or other users have set in their Blackboard Learn Profile.
- This tool will ONLY send to external email addresses and there will be no trace of the message left in Blackboard.
- The message will be sent from your email address and a copy of the message will be sent to you.
- Recipients can read and respond to this message in their email client. All replies will be sent to the sender’s email address.
Instructions:
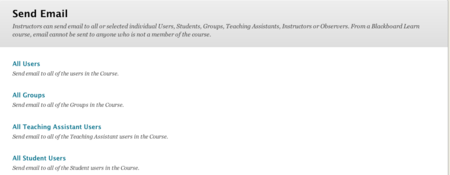
Click ‘Email’ in the table of contents.

You can send a message to various different groupings of users or to individual users (not shown here).
- Click the link to the grouping you would like to contact.

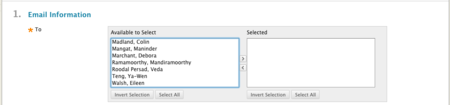
Depending on what you select in Step 2, you may have to select recipients.
- Click the recipient’s name and use the arrows to move them into the ‘Selected’ window.

Recipients will be listed beside ‘To’.
- Your email address is listed beside ‘From’.
- The subject that you enter will be appended to the course name in the subject line of the sent mail.
- There is no ‘Cc’ or ‘Bcc’ option because messages are sent out individually.

A copy of the message is automatically sent to your email address and you can also request a receipt to confirm delivery. Click ‘Attach a file’ to attach one or more files. Click ‘Submit’ to send the message.

Course Messages
Course Messages The Course Messages tool keeps all messages within your course in Blackboard and users must login to the course to check for new messages or replies. You cannot set up notifications to be sent to an external email address. You cannot add attachments to a Course Message.
Click ‘Course Messages’ in the table of contents.
- Click ‘Create Message’.

Choose recipients as you would with an Email (above).

Enter a subject and a message.
- Click ‘Submit’ to send your message.
- Add a Tool to the Table of Contents

Add a Tool to the Table of Contents
===To add a tool to the table of contents in your course, hover your cursor over the ‘+’ sign above the table of contents. Choose ‘Tool Link’.===
Make sure the tool is available to users.
- Click ‘Submit’.
Use the yellow handle to drag the tool to the desired spot in the table of contents.
If you have questions, please contact elearningfacilitator@tru.ca.
Delete a Tool from the Table of Contents
Hover your cursor over the link to the tool you would like to delete.
- Click the dropdown arrow.
- Choose ‘Delete’.
- Caution:
Be careful what you delete from the table of contents. If you delete a content area like a Learning Module or Content Folder, you may delete any content within it.