Documentation:Blackboard Learn Support Resources/creating group
Instructions for Blackboard Learn 9.1: Creating Groups
Blackboard Learn allows students to easily collaborate on assignments and projects in a secure space within your course. Follow these instructions to create a group set and assign an assignment to the groups.
Click ‘Users and Groups’ in the Control Panel. Click ‘Groups’.

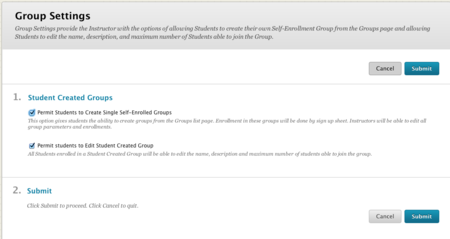
Click ‘Group Settings’ (top image) to allow or disallow student created groups.
- Click ‘Submit’ to save your settings.

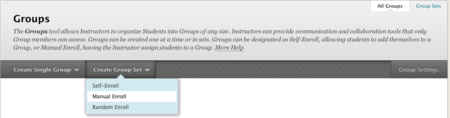
Hover your cursor over ‘Create Group Set’ and choose one of the three options.
- This tutorial will demonstrate how to create groups and manually enroll students into the groups.

Give the group set a name.
- Blackboard will automatically append a number to each of the groups that you create.
- If you create three groups called ‘Group’, you will end up with ‘Group 1’, ‘Group 2’, and ‘Group 3’.

Enter a description, if necessary.
- Ensure that the group is available, otherwise students will not be able to see the group.
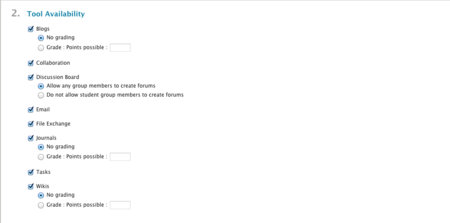
- 6. Deselect any tools which will not be needed in the groups.

Make sure you allow group members to create forums unless you have a specific reason to do otherwise.

- 7. Allow or disallow personalization. Enter the number of groups you would like to create.
Click ‘Submit’.

- 8. Set the filter options.
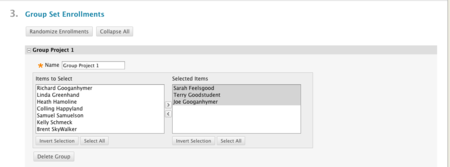
- 9. Click a name in the left column and click the right arrow to move them into the group.

Select multiple students using ‘shift+click’.

Use the left arrow to remove a student from the group. Repeat this process for the remaining groups.
- 10. Click ‘Submit’.

- 11. You will see your groups listed on the groups page.

Students will see their groups under ‘My Groups’. Click the name of a group to go to that group’s page.

12. The group page will show the group members, the group tools and any assignments assigned to that group.

Assigning to Groups
- 1. Group assignments must be assigned specifically to groups.
Click the dropdown menu beside the group assignment and choose ‘Edit’.

- 2. Scroll down to section 6, ‘Recipients’ and choose ‘Groups of Students’ (groups must be set up prior to this step). Move the groups to the ‘Selected Items’ window.
Click ‘Submit’.

- 3. Group assignments will be listed on each group’s page.

If you have questions, please contact elearningfacilitator@tru.ca.