Difference between revisions of "Documentation:Blackboard Learn Support Resources/assignments-faculty"
Jump to navigation
Jump to search

(Created page with "=Assignments= Blackboard Learn features many significant enhancements to faculty workflow when grading assignments, including the ability to annotate and grade student work r...") |
Mschuurman (talk | contribs) m (changed faculty to OLFM) |
||
| (11 intermediate revisions by 2 users not shown) | |||
| Line 1: | Line 1: | ||
=Assignments= | =Assignments= | ||
| + | Blackboard Learn features many significant enhancements to OLFM workflow when grading assignments, including the ability to annotate and grade student work right in your browser. Please note: OLFMs must still enter grades into myTRU. Entering grades into Blackboard does NOT trigger an assignment pay. | ||
| − | + | =Creating Assignments= | |
| − | + | Please follow these instructions to create an assignment in Blackboard Learn. | |
| − | + | ===To create a new assignment, you must first toggle the Edit Mode to ‘On’, then hover your cursor over ‘Assessments’ and choose ‘Assignment’.=== | |
| − | + | [[File:Create_Assignment_1.png|450px|centre]] | |
| − | |||
| − | |||
| − | |||
| − | |||
| − | [[File: | ||
| − | ''' | + | ===Enter a name and a description of the assignment using the Content Editor.=== |
| + | '''Tip:''' | ||
| + | Changing the colour of the assignment will change the colour of the title in the list of assignments. | ||
| + | [[File:Create_Assignment_2.png|450px|centre]] | ||
| − | |||
| − | |||
| − | |||
| − | |||
| − | + | ===If you need to attach files, click ‘Browse my Computer’ or ‘Browse Course’. Enter the number of points possible.=== | |
| − | * | + | * If you would like to associate a rubric with the assignment, |
| − | + | * follow the instructions contained in [[Documentation:Blackboard_Learn_Support_Resources/working_with_rubics|working with rubics]] available at the TRU Blackboard Support website. | |
| − | |||
| − | |||
| − | [[File: | + | [[File:Create_Assignment_3.png|450px|centre]] |
| − | |||
| − | |||
| − | |||
| − | |||
| − | |||
| − | |||
| − | |||
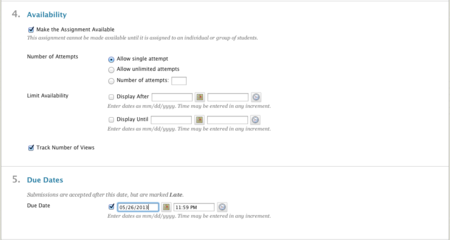
| − | [[File: | + | ===Adjust the dates that the assignment is available to students. You may want to click the box beside ‘Track Number of Views’.=== |
| + | [[File:Create_Assignment_4.png|450px|centre]] | ||
| − | |||
| − | |||
| − | |||
| − | |||
| − | |||
| − | [[File: | + | ===Set the due date and time.=== |
| + | '''Tip:''' | ||
| + | If you deliver a continuous entry course for Open Learning, you should leave this section blank. | ||
| + | [[File:Create_Assignment_5.png|450px|centre]] | ||
| − | |||
| − | |||
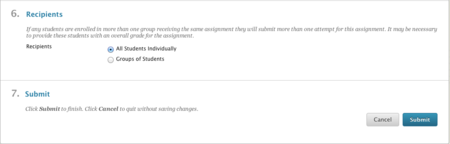
| − | [[File: | + | ===Assign the item to all individual students or to groups. Click ‘Submit’.=== |
| + | [[File:Create_Assignment_6.png|450px|centre]] | ||
| − | |||
| − | [[File: | + | ===You will see the green confirmation bar upon successful submission.=== |
| + | [[File:Create_Assignment_7.png|450px|centre]] | ||
| − | |||
| − | |||
| − | |||
| − | |||
| − | |||
| − | |||
| − | |||
| − | |||
| − | |||
| − | |||
| − | [[ | + | If you have questions, please contact [[elearningfacilitator@tru.ca]]. |
| − | + | =Edit assignments= | |
| + | |||
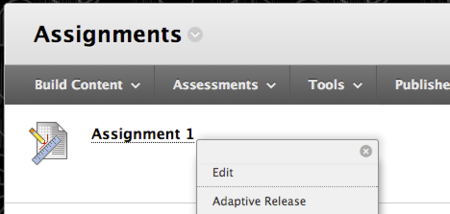
| + | ===Click on the assignment and it will give you the 'edit' option.=== | ||
| + | [[File:Edit Assignment 1.png|450px|centre]] | ||
| + | |||
| + | =Edit Due Dates= | ||
| + | |||
| + | {{#widget:YouTube|id=52Vvb6bKGhs|height=480|width=640}} | ||
Latest revision as of 15:16, 13 January 2017
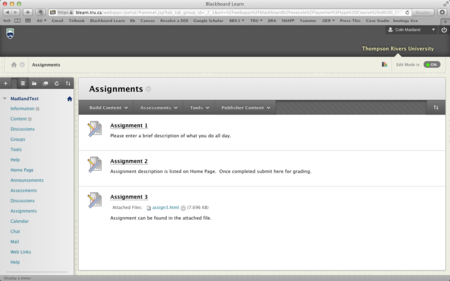
Assignments
Blackboard Learn features many significant enhancements to OLFM workflow when grading assignments, including the ability to annotate and grade student work right in your browser. Please note: OLFMs must still enter grades into myTRU. Entering grades into Blackboard does NOT trigger an assignment pay.
Creating Assignments
Please follow these instructions to create an assignment in Blackboard Learn.
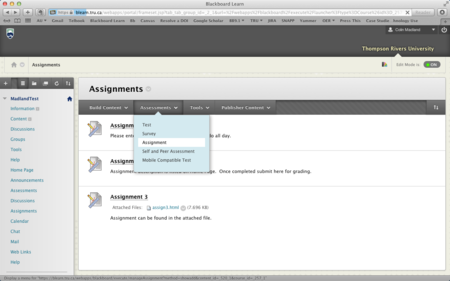
To create a new assignment, you must first toggle the Edit Mode to ‘On’, then hover your cursor over ‘Assessments’ and choose ‘Assignment’.

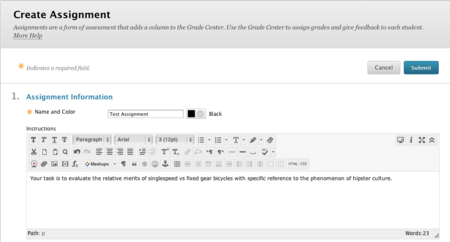
Enter a name and a description of the assignment using the Content Editor.
Tip:
Changing the colour of the assignment will change the colour of the title in the list of assignments.

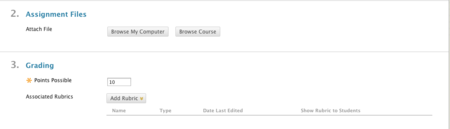
If you need to attach files, click ‘Browse my Computer’ or ‘Browse Course’. Enter the number of points possible.
- If you would like to associate a rubric with the assignment,
- follow the instructions contained in working with rubics available at the TRU Blackboard Support website.

Adjust the dates that the assignment is available to students. You may want to click the box beside ‘Track Number of Views’.

Set the due date and time.
Tip: If you deliver a continuous entry course for Open Learning, you should leave this section blank.

Assign the item to all individual students or to groups. Click ‘Submit’.

You will see the green confirmation bar upon successful submission.
If you have questions, please contact elearningfacilitator@tru.ca.
Edit assignments
Click on the assignment and it will give you the 'edit' option.

Edit Due Dates