Difference between revisions of "Documentation:Blackboard Learn Support Resources/add or delete tools"
Jump to navigation
Jump to search

| Line 1: | Line 1: | ||
| − | + | =Instructions for Blackboard Learn 9.1: Add or Delete Tools (Table of Contents)= | |
Follow these instructions for adding tool links to or deleting tool links from the table of contents. | Follow these instructions for adding tool links to or deleting tool links from the table of contents. | ||
| − | + | ===To add a tool to the table of contents in your course, hover your cursor over the ‘+’ sign above the table of contents.=== | |
| − | + | * Choose ‘Tool Link’.[[File:Add_Tool_1.png|250px|centre]] | |
| − | + | ===Give the tool a name. Choose the type of tool from the dropdown menu.=== | |
| − | + | [[File:Add_Tool_2.png|250px|centre]] | |
| − | + | ===Make sure the tool is available to users.=== | |
Click ‘Submit’.[[File:Add_Tool_3.png|250px|centre]] | Click ‘Submit’.[[File:Add_Tool_3.png|250px|centre]] | ||
| − | + | ===Use the yellow handle to drag the tool to the desired spot in the table of contents.=== | |
| + | [[File:Add_Tool_4.png|250px|centre]] | ||
===Delete a Tool from the Table of Contents=== | ===Delete a Tool from the Table of Contents=== | ||
Revision as of 11:16, 30 January 2015
Instructions for Blackboard Learn 9.1: Add or Delete Tools (Table of Contents)
Follow these instructions for adding tool links to or deleting tool links from the table of contents.
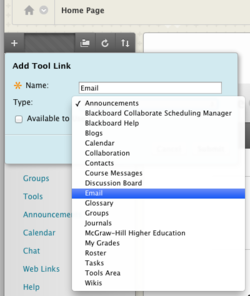
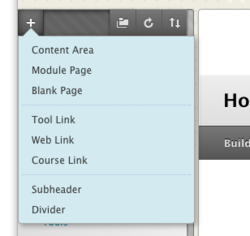
To add a tool to the table of contents in your course, hover your cursor over the ‘+’ sign above the table of contents.
- Choose ‘Tool Link’.


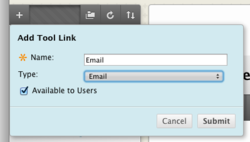
Make sure the tool is available to users.
Click ‘Submit’.

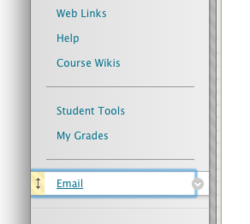
Use the yellow handle to drag the tool to the desired spot in the table of contents.

Delete a Tool from the Table of Contents
- Hover your cursor over the link to the tool you would like to delete.
- Click the dropdown arrow.
- Choose ‘Delete’.

Caution:
Be careful what you delete from the table of contents. If you delete a content area like a Learning Module or Content Folder, you may delete any content within it.
If you have questions, please contact elearningfacilitator@tru.ca.